Signed in as:
filler@godaddy.com
Click the "ADD EVENT" button to get started.
IMPORTANT TIP: Once you have created an event, you can click the + symbol next to it to make a copy, saving you time since most future events are identical (other than the date, of course).
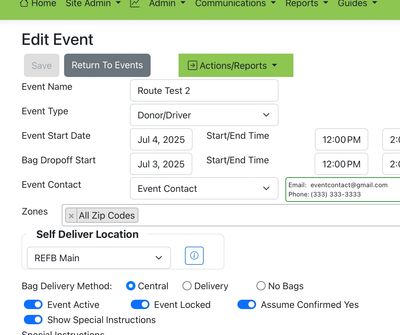
In the “Event Edit” window you will see;
ACTIONS/REPORTS drop down; these are covered in the sections further down.
Event Name; This is visible to the donors and drivers, so the name is important. It should help clarify. "July 12th Pickup" or "Rotary's July 12th Food Pickup".
Event Type; Donor/Driver is the default. If you have turned on the Canvassing (Brown Bag) in your chapter profile, you will see it as an option.
Event Start Date and Time: Most events are on a weekend, and usually start around 9am. It is important that you allow at least 2 hours, if not 3 hours, because this time window is fed into the Route Optimization window. If you get back a "Donor was not included" you will need to expand this time or add more drivers.
Bag Dropoff Start; This is for the "Bag delivery" event, which usually happens one to three days before the event itself. Only use this is you are delivering bags to the drivers.
Event Contact; This is populated by entries in the PROFILE page's 4th tab. This is the Event Manager's name, email and phone for donors/drivers to contact.
Zones; these are the zones for the event.
Self Deliver Location; this should be the default if it was set up in the profile. You can choose any location in your LOCATIONS list that has "self deliver" as its type.
Bag Delivery Method; your default from the profile should already pick either Central or Delivery, but you can change it here if you wish. Central means all the drivers will pick up their bags at a central location (which you set up in LOCATIONS) and delivery means you are getting the bags to them.
Event Active; if an event is no longer valid, set it as inactive. Doing this will remove all data from this event from all history reports.
Event Locked; When the routes are run, this is set to True. Once set to true donors and drivers cannot change their status, they get an email saying "event is locked, contact Event Manager". You can set this to false (unlocking the event) if you wish. Just be careful, if routes have been run this can cause a lot of issues since donors will have changed their status. If a donor cannot donate and they tell you after the route has been run, you can manually set them to "no", and the driver will see that real-time on their route app.
Assume Confirmed Yes: This is set by default based on your chapter's profile, this means that when the notifications go out all donors are set to "Yes", unless they specifically say "no". If "Assume Yes" is true, you can still require specific users to provide a yes/no answer by going to Reports then "Donor History", and setting any user to "Require Yes".
Show Special Instructions: If you enter text here donors and drivers will see it when they come to the site page from their notification link. This section has full text editing features such as paragraph breaks, bold/italic, different fonts and sizes, etc. This can be very useful to give your donors and drivers more information about what your event is all about.
”Edit Event” form is explained, field by field, in the section above.

The Events Screen accessed by clicking the Admin drop down displays all active Events, sorted by most recent. Click the pencil icon to edit an event. Click the + icon to create a copy of an event (a quick way to create a future event with the same info), and click “Add Event“ to create a new event.

The “Edit Event” form is covered field by field in the section above.

The Actions/Reports drop down provides other tools related to an event. Driver Selection sets up drivers. Bag Pick up handles bag delivery to drivers. Route Map provides the routing details. Route Update allows Admin to update route data for each driver. And Event History shows data related to drivers and donors.
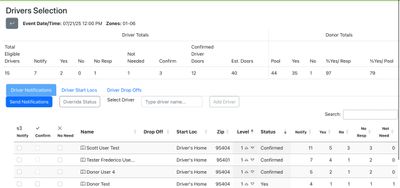
This tool allows you to do a few important things;
SELECTING DRIVERS:
This is a multi-step process.
Step 1: Estimate how many drivers you will need. There is some data at the top to help you do this. Look at the “Donor” section to see the total eligible donors and the status they are currently in.
“Notify” would mean that they have received a notification, but have not yet responded yes or no. Notifications go out based on the ‘days before’ settings you defined in your chapter profile. If “AssumeYes” is turned on for this event you will only see a “notify” status if a specific donor has been set to “require yes”. You will find more information about “AssumeYes” further down this page.
“Yes” is the # of donors that are “Assumed to be yes” or have said they are a “yes”.
“No” are the # of donors that have said they cannot participate this time.
Note; you have the same information for drivers, at the start you will have a 0 under every column except “total eligible drivers” since you have not yet sent out any notifications.
The first thing to decide will be the ‘driver to donor ratio’, or to say it another way “how many donors for each driver?”. For example, if you are in a city with donors close together one driver for 25 donors is about 90 minutes of work. As things spread out, it might be that 15 or 20 donors requires the same 90 minutes.
The second thing will be predicting the number of donors for the day of the event. 10 days from the event is more guesswork, the day or two before the event makes it easier to have a more accurate figure. When you set up the event you decided to either use “AssumeYes” or “Donor must confirm”, this is going to make a big difference in the calculation.
Notify, Yes, No, Not Needed, and Confirm are the different status’s for each driver.
Confirmed Driver Doors; this is a calculated field that takes total donors that have a status of “yes” and divides by confirmed drivers. The general idea is to get this figure close to 25 as the event date approaches. To understand this value, please consider the following;
Step 2: Send Notifications to a few more drivers than you think you need. Let’s stick with the example of “100 eligible donors”, which could mean 4 drivers. You might want to notify 4. A “notify” is to ask, “can you drive?”.
You therefore should then click the notify box for 4 drives, and then click “Send emails”. This sends a notification to those 4 drivers.
Selecting a Driver: You can choose based on any number of methods. You may already be familiar with some names. You can also see data related to each driver; how many times they have said “yes” and “no”, for example.
You can set their “Level”. This is your classification of the drivers. By setting one at 1 and another at 4, and then sorting on the “Level” column, you can put the 1’s at the top or bottom. This may help you get the ones you want at the top, making it easier to pick 4 good ones.
But another tip is to ask new people to driver, this is a way to get more engagement from your pool of eligible drivers.
NOT ENOUGH DRIVERSSco: This is going to happen from time to time. We recommend using the Donor History reports to find donors with a high degree of participation. Send them an email asking them to driver. (Or call them if you have the time). Or, you can just message every donor using the “Messaging App”. If someone agrees to drive, they (or You) can go to their profile and click “Yes I want to Drive”.
You can also bring drivers in that are not part of the Event’s Zone. For example, you may have other events for other zones, and wish to ask those drivers to drive for this Event. There is a dropdown to “Add Driver”, which displays all drivers from all other zones.
You then wait a bit to see who says "Yes, I can drive". Their status will change to "YES".
Step 3; Confirm drivers that have said "yes" by clicking the "confirm" column next to their name and sending those notifications. You can also notify more drivers if you need, just repeat Step 2.
STEP 4: Keep doing this until you have the drivers you need.
Too many drivers said “yes” or “confirmed”; This is when you use the “no need“ status column. "No Need" is when a driver is set to "yes" or "confirm" and you realize you don't' need them. When you send these notifications they are asked to stand by on a wait list. Click “no need” next to those drivers name, then “send notifications’. They can always change their status to “no, I can’t driver” if they don’t’ want to be on a wait
OPTIONAL TOOLS:
Override Status; You may override this process by clicking "OVERRIDE STATUS", when you do this you can then click any status you wish, then "Set Status". This allows you to change any drivers status yourself. Often this happens if you have spoken to them.
Select Driver; there may be a reason that you need to add a driver that is not in the zone. Perhaps it's a driver from another zone that has agreed to drive for you. As long as they are a registered user in your chapter you type in a few letters of their name (wait a bit, it takes time to build this filter) and you'll see drivers in other zones. Once you pick one, they are now part of this event and can be notified, confirmed, etc.

The fields in this Driver Selection form are described in the section above.

This image shows how the “Override Status” works. 1) click “Override Status”, 2) select the status you wish to force onto a driver, 3) click Set Status. This will result in that Status being assigned to that driver.

Note how each confirmed driver has a different starting point. These starting points are defined in the LOCATIONS tool under ADMIN.

Note how two drivers are dropping off at REFB Main, while the 3rd is dropping off at Olivers


